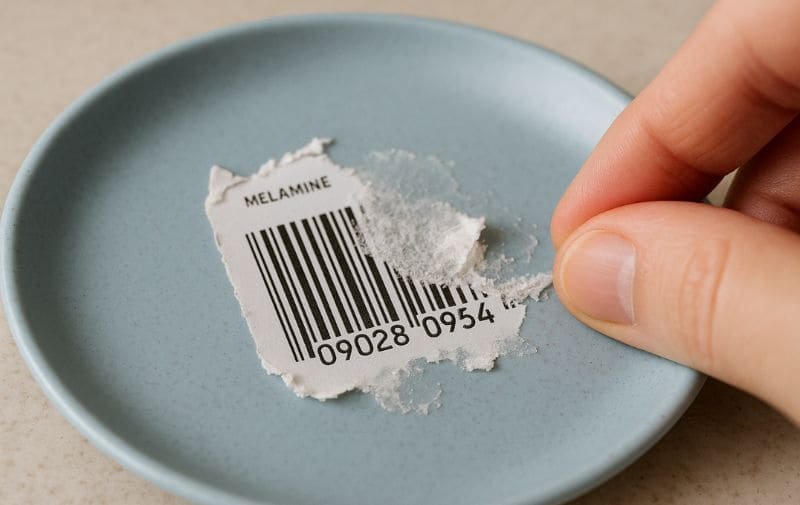
You’ve just bought a beautiful set of new melamine plates, but they’re marred by stubborn price tags and labels leaving behind a sticky, gummy residue. Your first impulse might be to grab a scouring pad or a harsh chemical, but stop. Those aggressive methods can permanently damage the glossy finish of your new dinnerware.
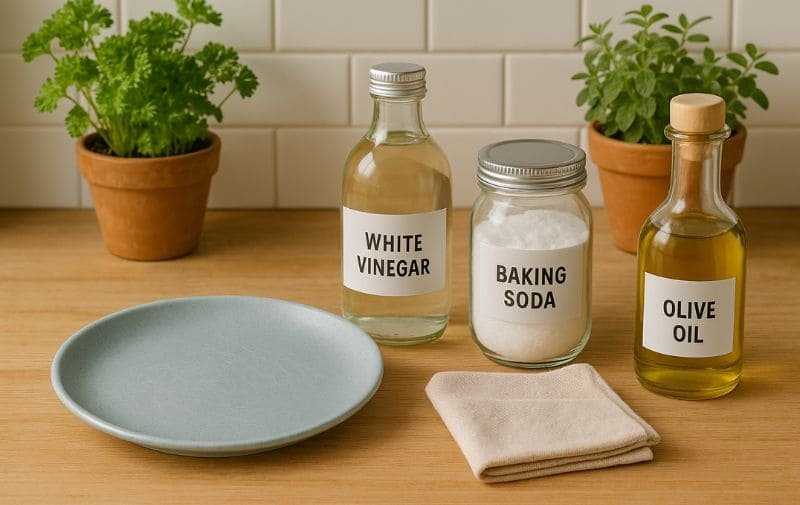
The safest and most effective way to remove sticker residue from melamine is to use common cooking oil. The oil breaks down the oil-based adhesive without harming the plate’s glossy finish. For tougher jobs, a light touch with rubbing alcohol or a hairdryer can also be used.
Using the wrong tool or chemical for this simple task is the number one way new plates get damaged before they even see their first meal. As a manufacturer, I have seen thousands of plates ruined by well-intentioned but incorrect cleaning methods. Forget the harsh chemicals and abrasive pads. In this guide, I’ll show you the professional, step-by-step escalation method to remove any sticker residue while keeping your new dinnerware in perfect, pristine condition.
Last Updated: Sep 22th 2025 | Estimated Reading Time: 12 Minutes
The Safest Methods: The Manufacturer’s Escalation Method
The golden rule of protecting a new plate’s finish is to start with the gentlest method first and only escalate if necessary. Jumping straight to the strongest solution is like using a sledgehammer to crack a nut—you risk causing collateral damage.
Don’t start with chemicals. The best approach is a three-step escalation: first, try a mechanical dry rub, then move to the “oil fights oil” method, and only use a solvent like rubbing alcohol as a last resort.
This professional method protects the plate’s crucial surface gloss, which is its armor against future stains and scratches.
Method 1: The Mechanical Method (Dry Rub & Scrape)
This should always be your first attempt.
- The Thumb Roll: Start by peeling the sticker off slowly from a corner. For any residue left behind, use the pad of your thumb and firm pressure to try and roll the adhesive off. Often, this is enough to gather the goo into a small ball that lifts away cleanly.
- The Plastic Scraper: If the thumb roll doesn’t work, use the edge of a plastic scraper, a plastic putty knife, or an old credit card. Hold it at a low angle and gently push the residue off. Never use a metal knife or blade.
Method 2: The Golden Rule (Fight Oil With Oil)
This is the secret weapon that will solve 90% of your sticker problems. Most label adhesives are oil-based, and the safest and most effective solvent for them is another oil.
- Choose Your Oil: Any common cooking oil will work perfectly. Vegetable oil, olive oil, canola oil, or even mineral oil are all excellent choices.
- Apply and Wait: Apply a generous dab of oil directly onto the residue, ensuring it’s completely covered. Let it sit for at least 15-20 minutes. This gives the oil time to penetrate and break down the adhesive’s molecular bonds.
- Wipe Away: After the soak, use a soft cloth, a paper towel, or your thumb to rub the area. The residue should now easily wipe away in gooey clumps.
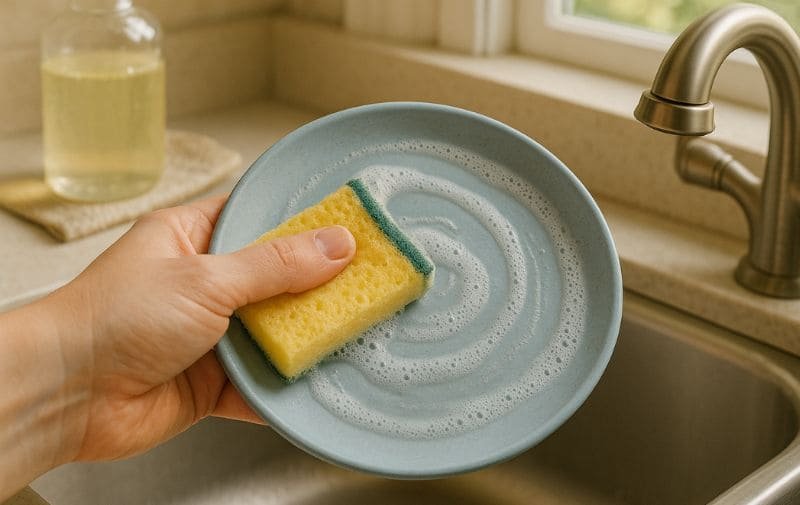
- Wash Clean: Once the residue is gone, wash the plate with warm water and dish soap to remove the excess oil.
Method 3: The Solvent Solution (Rubbing Alcohol or Vinegar)
If the oil method fails, it likely means the adhesive is solvent-based rather than oil-based. This is rare for consumer labels but can happen.
- Application: Apply a small amount of isopropyl (rubbing) alcohol or white vinegar to a cotton ball or the corner of a soft cloth. Dab it onto the residue.
- Wait Briefly: Let it sit for just a minute or two. These solvents work much faster than oil.
- Gently Rub: Gently rub the area until the residue dissolves and lifts away.
- Critical Tip: Before using alcohol or vinegar on the main surface, always test it on a small, inconspicuous area first, like the very bottom of the plate. On lower-quality melamine, these solvents can sometimes cause a slight dulling of the finish.
Method Comparison at a Glance
| Method | Best For | Risk to Plate Finish | Time Required | Why It Works |
|---|---|---|---|---|
| Mechanical Rub/Scrape | Fresh, non-gummy residue | Very Low (if using plastic) | 1-2 minutes | Physical force |
| Cooking Oil Soak | Most common gummy residues | Zero | 15-20 minutes | Oil dissolves oil-based adhesive |
| Rubbing Alcohol/Vinegar | Stubborn, non-oily residues | Low (but testing is required) | 1-2 minutes | Solvent dissolves adhesive |
The Step-by-Step Guide: How to Perfectly Remove Any Sticker Residue
Follow this manufacturer-approved escalation process for perfect results every time.
Step 1: Start with Mechanical Removal (No Liquids)
Before you apply anything, try to remove the bulk of the sticker and glue with gentle friction. Use the pad of your thumb to firmly roll the edge of the residue. Often, the friction and pressure are enough to gather the adhesive into a ball that you can pick off cleanly.
Step 2: Apply Your Chosen Cleaning Agent
- For Oil: Apply a generous dab of cooking oil directly onto the residue. Ensure the entire sticky area is coated.
- For Alcohol/Vinegar: Moisten a cotton ball or paper towel. Don’t pour the liquid directly onto the plate. Press the moistened cotton ball onto the residue.
Step 3: Let It Sit and Dissolve the Adhesive
This is the most important step. You must give the agent time to work.
- Oil: Let it sit for 10-15 minutes.
- Alcohol/Vinegar: Let it sit for 2-5 minutes. The liquid will evaporate faster.
Step 4: Gently Scrape and Wipe Away the Residue
Now that the adhesive is dissolved, it’s time to remove it.
- The Credit Card Trick: Use the edge of an old credit card, a plastic scraper, or even a sturdy guitar pick. Hold it at a low angle and use a gentle pushing motion. The softened residue will lift off in gooey clumps.
- The Wipe Down: Use a soft cloth or paper towel to wipe away the remaining residue.
Step 5: The Final, Essential Food-Safety Wash
Once all the residue is gone, the plate must be thoroughly washed to remove any remaining cleaning agents. Wash the plate with warm water and a good dish soap, then rinse completely. This ensures the surface is clean, clear, and perfectly food-safe.
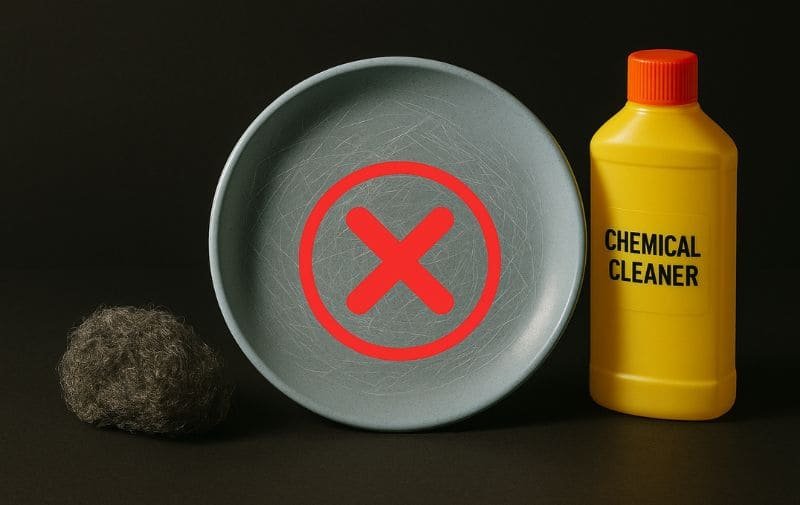
What Tools and Chemicals Should You Absolutely AVOID on Melamine?
Knowing what not to do is just as important as knowing what to do. Using any of the following items will ruin the protective glaze on your dinnerware, leading to permanent damage.
Never use abrasive cleaners, scouring pads, harsh chemical solvents, or metal scrapers on melamine. These items will physically scratch or chemically attack the plate’s surface, causing irreversible damage that leads to dullness and staining.
Think of your plate’s glossy finish as its armor. Once that armor is compromised, the plate is vulnerable.
The Forbidden Tools & Chemicals
| Item to AVOID | Why It Damages Melamine | What to Use Instead |
|---|---|---|
| Steel Wool / Green Scouring Pads | These are highly abrasive and will create thousands of tiny scratches, permanently dulling the finish. | A soft cloth, sponge, or paper towel. |
| Abrasive Cleaners (e.g., Comet, Ajax) | The gritty particles in these powdered cleansers act like sandpaper, scouring away the protective glaze. | Warm water and standard dish soap. |
| Harsh Solvents (Acetone, Paint Thinner) | These aggressive chemicals can chemically attack and soften the melamine resin itself, causing warping or pitting. | Cooking oil or a small amount of rubbing alcohol. |
| Metal Knives / Razor Blades | This is a recipe for disaster. It is impossible to scrape with a metal blade without inevitably gouging the surface, creating a deep scratch that harbors bacteria. | A plastic scraper or the edge of a credit card. |
| Bleach / Oven Cleaner | These caustic cleaners are far too strong for melamine and will strip the finish, leaving the plate looking chalky and dull. | Dish soap for cleaning, oil for residue. |
Why Your Plate’s Quality Directly Affects Sticker Removal
Have you ever had a sticker peel off one product effortlessly, while another leaves behind a concrete-like residue? This isn’t random. On melamine, the difficulty of removing a sticker is often a direct indicator of the plate’s quality.
High-quality A5 melamine has a dense, non-porous glaze that prevents adhesive from seeping in, making sticker removal easy. Cheaper A1 melamine is more porous, allowing the glue to bond deeply with the surface.
If you’re struggling immensely to remove a sticker, it’s often a sign of a lower-grade material where the adhesive has become chemically and physically enmeshed with the plate surface. This is one of the many hidden reasons why investing in 100% A5 grade melamine pays off in the long run—even maintenance is easier.
How Do You Tackle Extremely Old, Hardened-On Sticker Residue?
What if you find old melamine plates at a thrift store with price tags that have been fossilized on for years? For these extra-tough jobs, you may need to combine methods and add a gentle touch of heat.
For hardened residue, use a hairdryer on low heat to soften the old adhesive first, then follow up with the oil soak method. The heat makes the brittle glue pliable again, allowing the oil to penetrate and do its job.
This is an advanced technique and requires caution.
- Apply Gentle Heat: Use a hairdryer on its lowest heat setting.
- Keep Your Distance: Hold the hairdryer about 6 inches (15 cm) away from the sticker.
- Constant Motion: Move the hairdryer back and forth over the area for 30-45 seconds. Do not concentrate the heat on one spot.
- Test the Residue: The glue should become soft and tacky. At this point, you can often peel it off or proceed directly to the oil soak (Step 2 above). The warm, softened residue is much more receptive to the oil.
CRITICAL WARNING: Never use a high-powered heat gun and never concentrate heat on one spot for too long. Excessive heat can cause the melamine to discolor or blister.
Quick Tips for Restaurants: Removing Stickers from a Bulk Order
If you’re a restaurant manager unboxing hundreds of new plates, removing each sticker one by one is a nightmare. The key is to set up an efficient assembly line.
For bulk sticker removal, create an assembly line: one person applies oil to a batch of plates, lets them sit while working on the next batch, and then a second person follows behind to wipe, scrape, and wash.
- Set Up Stations: Create distinct areas for each step. Station 1: Unboxing and peeling the top layer of the sticker. Station 2: Applying oil (use a squeeze bottle to be fast).
- Batch and Soak: Have one person apply oil to 20-30 plates and stack them carefully. By the time they finish the last one, the first one has soaked long enough.
- Wipe and Wash: A second person can then take the soaked stacks and quickly wipe/scrape the residue off before placing them in the dish rack to be run through the commercial dishwasher.
- Consider Commercial Cleaners: For massive jobs, a food-safe commercial citrus cleaner can be effective. These products work on the same “oil fights oil” principle (citrus oil is a powerful solvent) but can be faster. Always ensure the product is NSF-certified or rated food-safe, and test it on one plate first.
Conclusion
Removing sticker residue from melamine doesn’t have to be a battle. By following the “fight oil with oil” principle and using the gentle escalation method, you can easily remove even the most stubborn adhesive without leaving a single mark, ensuring your new plates look perfect from day one.stine and beautiful from the very first day and for years to come.
Frequently Asked Questions (F.A.Q.)
1. Can I use products like Goo Gone or WD-40 on melamine?
While many of these products are effective adhesive removers, they are often petroleum or citrus-based solvents. It’s critical to test them on an inconspicuous spot first, as some formulations can dull the finish of certain melamine glazes. The cooking oil method is a safer first choice because it is guaranteed not to harm the surface.
2. I removed the sticker, but the area still feels slightly sticky. What now?
This usually means a very thin layer of adhesive remains. Simply re-apply a small amount of cooking oil, let it sit for 5 minutes, and then rub it off with a clean cloth. Follow with a wash in warm, soapy water to remove the final traces of oil and residue.
3. Does this sticker removal method work on melamine bowls and cups too?
Yes, absolutely. The material and its surface glaze are the same. This method—from the oil treatment to the gentle heat tip—is safe and effective for any high-quality A5 grade melamine kitchenware.
4. I washed the plate, but now I see a faint outline of the sticker. How do I remove it?
This “ghosting” happens when the area under the sticker was protected from microscopic scuffs that the rest of the plate received during shipping. To fix this, create a paste of baking soda and a little water. Gently rub this non-abrasive paste over the entire surface of the plate to even out the finish, then wash as normal.
5. Why shouldn’t I just put the plate in the dishwasher to remove the sticker?
A dishwasher’s heat can bake the adhesive on even harder, making it more difficult to remove later. Furthermore, the paper and glue can come off in the wash, clogging your dishwasher’s filter and spray arms. Always remove labels and residue by hand before the first wash.
6. Is peanut butter a good option for removing sticker residue?
Yes, peanut butter can work well. The principle is the same as the “fight oil with oil” method, as the oils in the peanut butter dissolve the adhesive. It can be a bit messier to clean up afterward, but it is a perfectly safe and effective alternative.
Recommended:
